
Choose the right board size
Selecting the correct board dimensions ensures your presentation looks abundant without becoming cluttered. A personalized cheese board acts as the stage for your ingredients, so the scale must match the crowd. If the board is too small, guests will feel rushed; if it is too large, the arrangement will look sparse and empty.
A good rule of thumb is to allocate 6 to 8 square inches of surface area per guest. For a small gathering of four to six people, a board measuring 12 by 18 inches provides ample space for a mix of hard and soft cheeses. This size comfortably fits a wedge of Camembert, a block of Taleggio, and a chunk of Romano without forcing them into corners.
For larger parties of eight to ten guests, opt for a board that is at least 18 by 24 inches or larger. This extra surface area allows you to create distinct zones for different cheese textures and add room for crackers, fruits, and nuts. The goal is to let each cheese breathe, making it easy for guests to serve themselves without digging through the pile.

As an Amazon Associate, we may earn from qualifying purchases.
When choosing a personalized board, consider the shape as well as the size. Rectangular boards offer linear space that is easy to organize, while circular boards can create a more intimate, focused display. Match the board’s capacity to your expected guest count to ensure a balanced and inviting presentation.
Prepare your cheese selections
The foundation of a great cheese board lies in the temperature and variety of your selections. Cold cheese mutes flavor and hardens texture, making even the finest wheels taste dull. Let your cheeses come to room temperature before serving; this allows the fats to soften and the aromatic compounds to release.
Start with soft, creamy varieties like Camembert. These cheeses offer a rich, buttery mouthfeel that pairs well with crisp crackers or fresh fruit. Next, include a washed-rind cheese such as Taleggio. Taleggio has a distinct pungent aroma and a sticky, yielding texture that contrasts beautifully with harder cheeses.
Finish with a firm, aged cheese like Romano. Its sharp, salty profile cuts through the richness of the softer options and adds a necessary crunch to the board. Aim for a mix of textures and intensities to keep every bite interesting.
Arrange the board step by step
Building a personalized cheese board is less about random scattering and more about intentional placement. When you have a board with a specific shape or engraving, the layout should complement those features rather than hide them. Start with the largest items and work your way down to the smallest garnishes, ensuring every component has its own space while contributing to the whole.
Place your cheeses first. This anchors the board and defines the visual weight. For a balanced mix, cut soft cheeses like Camembert into wedges or leave them whole if they are small. Slice semi-hard cheeses like Taleggio into thin rectangles or cubes. Hard cheeses like Romano can be broken into irregular shards or shaved. Arrange them in a triangle or scattered pattern around the board, leaving space for accompaniments. If your board has an engraved design, position the cheeses to frame it without covering the text.
Add your savory elements next. Roll or fold cured meats like prosciutto or salami to create height and texture. Place crackers and breadsticks in small clusters or fans near the cheeses they pair with. Avoid laying everything flat; folding meat and stacking crackers adds dimension. If your personalized board has a specific shape, such as a heart or monogram, use the crackers to fill the negative space around the cheese clusters.
Introduce color and contrast with fruits, nuts, and honey. Place fresh berries, figs, or apple slices in small bowls or directly on the board. Scatter nuts like almonds or walnuts in the empty corners. Drizzle honey or jam into small dishes to prevent it from running onto the crackers. These elements break up the savory tones and add visual interest. Position them so they lead the eye across the board, connecting the different cheese types.
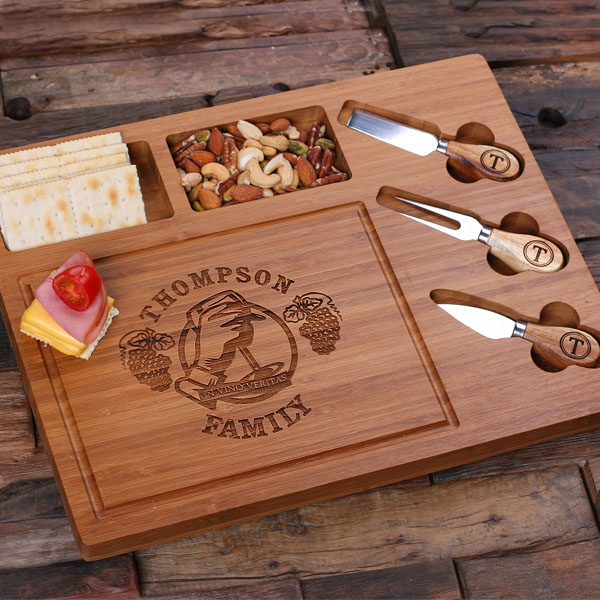
Complete the board with fresh herbs, olives, and serving tools. Sprinkle rosemary or thyme leaves over the cheeses for a pop of green. Place olives in a small ramekin or cluster them near the crackers. Add your cheese knives and spreaders in a logical spot, such as near the hard cheeses. Finally, check for balance: ensure there are no large empty spaces and that the colors are distributed evenly. Your personalized cheese board is now ready for guests.
Select proper cheese slicers
The right tool prevents crumbling and preserves the cheese’s texture. A dull knife or the wrong slicer turns a soft Camembert into a mess and shatters a hard Romano into dust. Match the slicer to the cheese density for clean, presentable slices.
Wire slicers for soft and semi-soft cheeses
Wire slicers use tensioned wire to cut through creamy textures without squishing them. This is ideal for Brie, Camembert, or Taleggio, where a blade might drag or compress the interior. The thin wire creates a clean cut that holds its shape on the board.
Plane slicers for hard and aged cheeses
Plane slicers (or mandoline-style cutters) shave thin, uniform slices from hard cheeses like Parmigiano-Reggiano, aged Gouda, or Romano. The blade glides over the surface, producing delicate ribbons that add visual height and elegance to the arrangement. Avoid using these on soft cheeses, as the blade will stick and tear.
Comparison of slicer types
| Slicer Type | Best For | Cut Style | Risk of Crushing |
|---|---|---|---|
| Wire Slicer | Soft, creamy cheeses (Camembert, Brie) | Clean, round slices | Low |
| Plane Slicer | Hard, aged cheeses (Romano, Parmesan) | Thin, uniform shavings | None |
| Knife (Chef's) | All types (versatile) | Variable thickness | Medium to High |
Choose one wire slicer and one plane slicer for a balanced board. This combination covers most common cheese textures while maintaining a professional, tidy appearance.
Avoid common styling mistakes
Even the best personalized cheese boards can fall flat if the presentation feels cluttered or the ingredients are served incorrectly. A few simple adjustments can keep your board looking elegant and your guests happy.
Don't overcrowd the board
Leave enough negative space between items. A crowded board looks chaotic and makes it difficult for guests to navigate. Think of the board as a canvas, not a full plate. Leave room for the cheese to breathe and for guests to place their crackers or fruit without knocking things over. If the board looks too empty, add more variety rather than piling items on top of each other.
Use the right knives
Different cheeses require different tools to cut cleanly. Using a standard kitchen knife on a soft cheese like Camembert will squish it into a mess. Use a soft cheese knife with a hole or a forked tip to lift wed of Camembert or Taleggio without damaging the rind. For hard, aged cheeses like Romano, a standard cheese knife or a small cleaver works best to break off clean shards. Keep your tools separate to avoid cross-contamination of flavors.
Serve cheese at the right temperature
Cheese loses much of its flavor and texture when served too cold. Refrigerated cheese is hard and waxy, dulling the nuanced tastes you worked hard to select. Take your cheeses out of the fridge 30 to 60 minutes before serving. This allows them to come to room temperature, softening the texture and releasing their full aroma. A cheese board that is too cold will feel stiff and uninviting, no matter how beautiful the presentation.
Final Presentation Checklist
Before your guests arrive, use this quick checklist to ensure your personalized cheese board is ready for serving. A well-stocked board relies on balance and accessibility.
- Cheese readiness: Take Camembert and Taleggio out of the refrigerator 30 minutes before serving to allow their flavors to develop. Keep the Romano chilled until the last moment to preserve its sharp crunch.
- Accompaniment variety: Arrange crackers, nuts, and fresh fruit in small clusters around the cheeses. This creates visual interest and makes it easy for guests to mix and match flavors.
- Tools and labeling: Place cheese knives near the corresponding cheeses. If using a personalized board with compartments, ensure they are clean and dry.
- Garnish touch: Add a few fresh herbs or edible flowers on top for a final pop of color.
-
Cheese at room temperature
-
Crackers and fruits arranged
-
Knives and labels in place
-
Board wiped and garnished
No comments yet. Be the first to share your thoughts!