
What makes a Cheesie board special
A standard grilled cheese is a handheld sandwich, but a Cheesie board is an experience built around texture and shareability. The aesthetic, popularized by Chicago’s Cheesie’s Pub & Grub, transforms the classic comfort food into a visual spectacle. Instead of a single slice, you are looking for a golden, crispy crust that gives way to an intensely gooey, molten cheese center. This is not just about melting cheese; it is about the structural integrity of the bread holding a massive volume of pullable dairy.

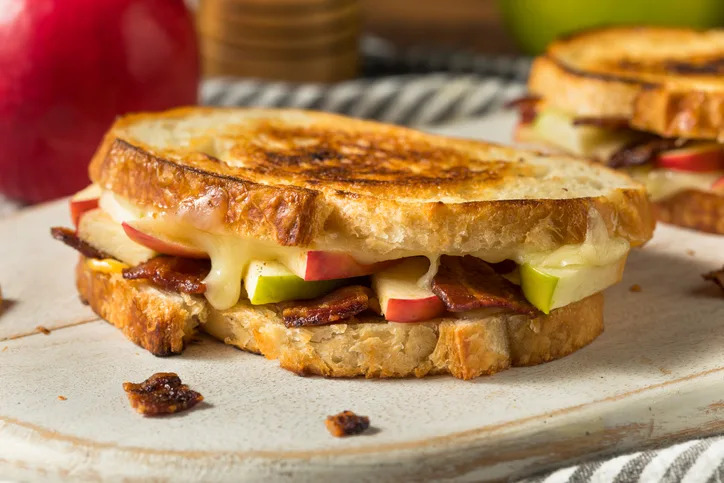
The defining feature of this style is the "cheese pull." When you pull a piece away, the cheese should stretch in long, continuous strands without breaking. This requires a specific blend of cheeses—often a mix of cheddar for flavor and mozzarella for elasticity—and a precise cooking technique that ensures the bread browns before the cheese burns. The result is a sandwich so cheesy it defies traditional sandwich geometry, served not on a plate, but as a centerpiece.
To achieve this at home, you must abandon the expectation of a neat, two-slice meal. A Cheesie-inspired board is messy by design. It relies on thick cuts of bread, generous buttering for maximum crunch, and a cheese ratio that prioritizes abundance over balance. The goal is to create that signature gooey core that demands you use your hands, distinguishing it sharply from the drier, more compact grilled cheeses found in most cafes.
Gather the right bread and cheese
The magic of a Cheesie-inspired sandwich starts with two simple components: a bread that can handle the heat and a cheese that melts without breaking. At Cheesie’s Pub & Grub in Chicago, the goal is a consistent, gooey pull that holds together even when you lift it. You can replicate that quality at home by choosing ingredients with specific structural properties.
Choose sturdy, thick-cut bread
Thin sandwich bread turns soggy and collapses under the weight of melted cheese. Instead, look for bread with a tight crumb and a sturdy crust. Sourdough, Texas toast, or a thick-cut white pullman loaf work best. These varieties create a barrier that keeps the interior moist while the exterior crisps up in the pan. Avoid overly airy breads like ciabatta for this specific style, as the large holes can let cheese leak out too quickly.
Select high-melt cheeses
The "Cheesie" texture comes from cheeses with high moisture and fat content that melt into a liquid state rather than just softening. American cheese is the industry standard for this reason; it contains emulsifiers that keep the fat and water bound together, creating that signature smooth, elastic pull. For a more complex flavor profile, blend American with a sharp cheddar or a mild gruyère. The American cheese provides the structure, while the harder cheeses add depth.


As an Amazon Associate, we may earn from qualifying purchases.
Assemble and grill the sandwich
The magic of a Cheesie’s sandwich lies in the ratio of bread to cheese and the patience applied to the grill. Unlike standard diner fare, this style demands a heavy hand with the butter and a steady eye on the heat. You are building a structural unit where the cheese acts as the mortar and the bread serves as the protective shell. If the heat is too high, the bread burns before the cheese melts; too low, and the bread turns greasy and soggy. Aim for a medium-low flame that allows the exterior to crisp into a golden, caramelized crust while the interior transforms into a smooth, stretchy pull.
Prep the bread and cheese
Start by slicing your bread. While Cheesie’s often uses thick-cut white or sourdough, any sturdy loaf works if it can hold up to the moisture. Spread a thin, even layer of softened unsalted butter on one side of each slice. This butter layer is your heat conductor and flavor enhancer, creating the signature crunch. For the cheese, stick to the classic American blend or a mix of sharp cheddar and gruyère for depth. Slice the cheese uniformly so it melts at the same rate. Place the cheese directly onto the unbuttered side of the bottom slice, leaving a small border to prevent messy overflow.
Build the sandwich
Layering is critical for the "smashed" aesthetic. Place the top slice of bread on the cheese, buttered-side facing up. Press down firmly with your palm. This compression is non-negotiable; it eliminates air pockets that cause uneven melting and ensures the bread adheres to the cheese as it cooks. If you are adding extras like tomato or bacon, add them now, but keep the layers thin to maintain structural integrity. The goal is a compact, dense sandwich that holds together when flipped.
Grill to golden perfection
Heat your skillet or griddle over medium-low heat. Place the sandwich in the pan, buttered-side down. Listen for a gentle sizzle, not a roar. Let it cook undisturbed for about three to four minutes. Lift a corner to check the color; you want a deep golden brown, not black. Once the bottom is crisp, flip the sandwich with a wide spatula. Press down again lightly to ensure even contact with the pan. Cook the second side for another three to four minutes. The sandwich is done when the cheese is fully melted and oozing slightly from the edges, and the bread offers resistance when pressed.
Rest and slice
Remove the sandwich from the heat and let it rest on a cutting board for one minute. This brief pause allows the internal temperature to stabilize and the cheese to set slightly, preventing a catastrophic cheese slide when you cut it. Use a serrated knife to slice diagonally. The diagonal cut exposes more of the molten cheese interior, enhancing the visual appeal and ensuring every bite has the perfect balance of crispy bread and gooey center. Serve immediately while the cheese is still hot and stretchy.
-
Butter applied evenly to outer bread surfaces
-
Cheese sliced uniformly for even melting
-
Sandwich pressed firmly to remove air gaps
-
Skillet heated to medium-low before adding sandwich
-
Bread golden brown, not burnt, on both sides
-
Cheese fully melted and slightly oozing
-
Sandwich rested for 60 seconds before cutting
style the board with sides and dips
A grilled cheese board is less about a single sandwich and more about the balance of textures and temperatures surrounding it. The goal is to create a spread that feels like a mini-pub experience, capturing the casual, hearty vibe of Cheesie’s without the crowded tables. Think of the board as a stage: the sandwich is the star, but the sides are the lighting and set design that make the moment memorable.
Start by placing the cut sandwich in the center or slightly off-center to anchor the composition. If you are using the classic sliced white bread style, the golden-brown crust provides a strong visual base. Cut the sandwiches into quarters or triangles to make them easy to grab, ensuring the cheese pull is visible on at least one piece. This visual cue signals quality and invites the first bite.
Surround the sandwich with three distinct zones of accompaniments. First, add a warm, comforting element like a small bowl of tomato soup or a creamy tomato basil dip. The liquid contrast against the solid bread is essential. Second, include a crunchy, acidic counterpoint. Cornichons, dill pickle spears, or pickled red onions cut through the richness of the melted cheese, cleaning the palate between bites. These should be scattered loosely around the edge rather than piled high, allowing the bread to breathe.
Finally, fill in the gaps with savory crunches and sauces. A handful of salted potato chips, pretzel crisps, or toasted baguette slices adds textural variety. Drizzle or place small dollops of spicy mustard, truffle aioli, or a simple herb-infused olive oil near the sandwich corners. The arrangement should feel intentional but relaxed, mimicking the way a chef might plate a dish in a bustling Chicago pub. The result is a board that is as inviting to look at as it is to eat, ready for sharing or solo indulgence.
Common grilling mistakes to avoid
You want that signature Cheesie’s melt without the burnt crust. The difference between a sad sandwich and a perfect board centerpiece comes down to heat management and timing.
Burnt bread usually means the pan is too hot. Cheese needs time to go gooey; high heat sears the outside before the inside softens. Keep your burner on medium-low. If you see the butter sizzling violently, you’ve already lost. Cover the pan with a lid for the last few minutes of cooking. The trapped steam helps the cheese melt evenly while the bread finishes crisping to a golden brown.
Cold centers happen when the cheese doesn’t have enough time to soften. Slice your cheese thinly and let it sit at room temperature for ten minutes before assembling. This small step ensures the cheese melts quickly and uniformly.
Finally, don’t flip too early. Let the bottom slice develop a deep, even golden color before turning. Rushing the flip results in uneven melting and a wobbly sandwich that falls apart on the board.
No comments yet. Be the first to share your thoughts!